How Do Professionals Perform Wet Wall Drying Safely?
When water damage strikes a home or commercial property, it can lead to severe structural issues if not addressed promptly. Wet wall drying is one of the most effective techniques for restoring affected areas safely and efficiently. But how do professionals perform this process without causing further damage? Understanding the steps involved in wet wall drying and ceiling drying can help property owners make informed decisions during water damage restoration.
What Is Wet Wall Drying?
Wet wall drying refers to the process of removing moisture trapped inside walls caused by leaks, floods, or condensation. Unlike surface drying, which only addresses visible dampness, wet wall drying targets hidden moisture that can weaken structural integrity over time. Moisture left untreated can result in mold growth, rotting wood, peeling paint, and even compromised electrical systems.
Professionals use advanced equipment to detect, extract, and dry moisture effectively. Structural Drying Australia emphasizes that wet wall drying requires precision and expertise to prevent further damage.
Why Is Professional Wet Wall Drying Necessary?
Many property owners attempt DIY solutions for water damage, like using towels or small fans, but these methods rarely reach moisture deep within walls or ceilings. Professional wet wall drying ensures:
-
Accurate Moisture Detection: Professionals use thermal imaging cameras and moisture meters to locate hidden wet areas.
-
Safe Drying Techniques: High-powered air movers, dehumidifiers, and injectidry systems reduce moisture safely without harming walls or ceilings.
-
Mold Prevention: Rapid and thorough drying stops mold and mildew before they can develop.
-
Structural Integrity: Proper wet wall drying ensures walls and ceilings maintain strength and stability.
Structural Drying Australia highlights that even minor water damage can escalate quickly, so professional intervention is critical for long-term safety.
How Do Experts Prepare for Wet Wall Drying?
Before starting wet wall drying, professionals carefully assess the damage. They consider the following:
-
Type of Wall Material: Drywall, plaster, and timber respond differently to moisture.
-
Extent of Damage: Professionals identify how far water has penetrated to prevent incomplete drying.
-
Electrical Safety: Any electrical outlets or wiring near wet walls are deactivated to avoid hazards.
-
Access Points: In some cases, small holes or panels are created to allow air to circulate behind the wall.
This preparation ensures the drying process is both safe and effective. Experts also determine if ceiling drying is necessary, as water often travels upward through walls and can saturate ceilings.
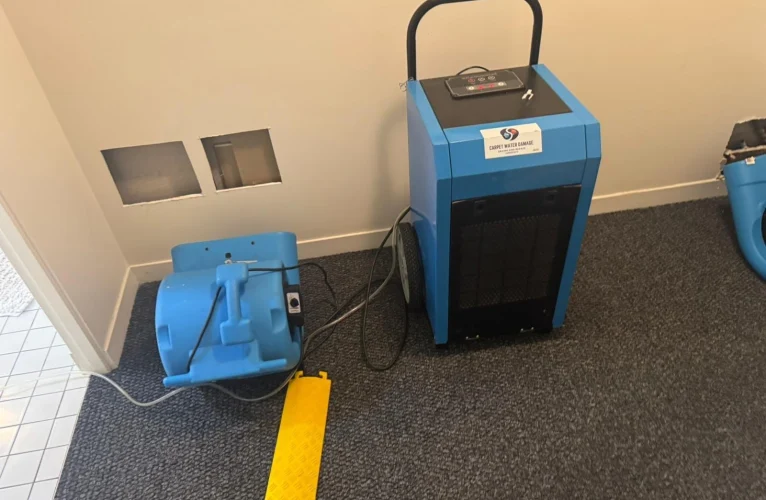
What Equipment Do Professionals Use for Wet Wall Drying?
The success of wet wall drying relies on specialized tools designed to remove moisture efficiently:
-
Dehumidifiers: Extract excess humidity from the air, reducing moisture content in walls and ceilings.
-
Air Movers: High-velocity fans create airflow behind walls and in ceilings to accelerate drying.
-
Injectidry Systems: Deliver warm, dry air directly into wall cavities without dismantling structures.
-
Moisture Meters: Monitor moisture levels in real time to ensure walls are fully dry before finishing.
-
Thermal Imaging Cameras: Detect hidden pockets of moisture to prevent unseen damage.
By combining these tools, professionals can complete wet wall drying safely, minimizing structural damage while speeding up the restoration process.
How Is Wet Wall Drying Performed Safely?
Safety is the cornerstone of professional wet wall drying. Experts follow several key steps:
Step 1: Moisture Assessment
Technicians identify all areas affected by water, including walls, ceilings, and floors. They check for structural weaknesses and potential hazards such as electrical outlets or mold growth.
Step 2: Containment
Professionals often use plastic sheeting or barriers to contain moisture and prevent it from spreading to unaffected areas. This containment also protects occupants from potential mold spores.
Step 3: Controlled Drying
Using air movers, injectidry systems, and dehumidifiers, technicians gradually remove moisture from wall cavities. Rapid drying is avoided, as sudden moisture removal can cause walls or ceilings to crack or warp.
Step 4: Continuous Monitoring
Moisture meters track drying progress, and adjustments are made as needed. Ceiling drying may be performed simultaneously to address water that has migrated upward.
Step 5: Verification and Restoration
Once walls and ceilings reach safe moisture levels, professionals verify that all areas are thoroughly dried. The final step often involves minor repairs or restoration to ensure the property looks and functions as it did before the damage.
Why Is Ceiling Drying Often Part of the Process?
Water doesn’t always stay in one place. Leaks from roofs, plumbing, or upper floors can cause moisture to accumulate in ceilings. Ceiling drying prevents:
-
Sagging or collapsing ceilings
-
Discoloration and staining
-
Mold and mildew growth
-
Odors and long-term damage
By performing ceiling drying alongside wet wall drying, professionals ensure the entire affected area is completely dry, reducing the risk of future structural or health issues.
How Long Does Wet Wall and Ceiling Drying Take?
Drying time depends on the extent of water damage, wall material, and environmental conditions. On average:
-
Minor water damage may require 24 to 48 hours of drying.
-
Moderate damage can take 2 to 5 days.
-
Extensive damage or multiple wet areas may take a week or longer.
Professionals continuously monitor progress and adjust equipment to achieve safe moisture levels efficiently. Rushing the process can compromise results and lead to long-term problems.
How Can Homeowners Ensure Safe Drying?
While professionals handle the technical aspects, homeowners can support the process by:
-
Removing personal items from wet areas to prevent contamination
-
Avoiding DIY drying methods that could worsen damage
-
Following guidance from restoration experts on safety measures and timelines
-
Scheduling inspections with certified water damage restoration specialists
Structural Drying Australia advises that professional intervention is essential, especially when walls and ceilings are deeply saturated.
What Are the Benefits of Professional Wet Wall Drying?
Choosing a professional wet wall drying service offers several advantages:
-
Safety: Eliminates the risk of electrical hazards and structural collapse.
-
Efficiency: Advanced tools and techniques reduce drying time.
-
Thoroughness: Hidden moisture is detected and removed, preventing mold growth.
-
Cost Savings: Prevents expensive repairs caused by untreated water damage.
-
Peace of Mind: Experts ensure walls and ceilings are fully restored, maintaining property value and safety.
By investing in professional wet wall drying and ceiling drying, property owners protect both their home and their health.
Conclusion: Why Professionals Are Key to Safe Wet Wall Drying
Wet wall drying and ceiling drying require specialized knowledge, equipment, and safety measures. Professionals like Structural Drying Australia perform each step meticulously, ensuring thorough moisture removal and preventing future damage. Attempting DIY methods can lead to incomplete drying, mold growth, and structural deterioration.
In situations involving water damage, relying on certified experts guarantees that walls and ceilings are dried safely, efficiently, and effectively. Trusting professionals ensures the long-term safety and integrity of your property, giving you peace of mind in the aftermath of water damage.